Linked List
- 파이썬에서는 Array List 구현이 잘되어 있어서 잘 가져다 썼지만 이번엔 직접 구현해보는것이 중요.!
Linked List는 노드라는 구조체가 연결되어 있는 형태다. 노드는 데이터 값과 다음 노드의 주소값을 저장한다. Linked List는 메모리상에서 비연속적으로 저장이 되어있지만 각각의 노드가 다음 노드의 메모리 주소값을 가리킴으로써 논리적인 연속성을 갖게 됩니다.
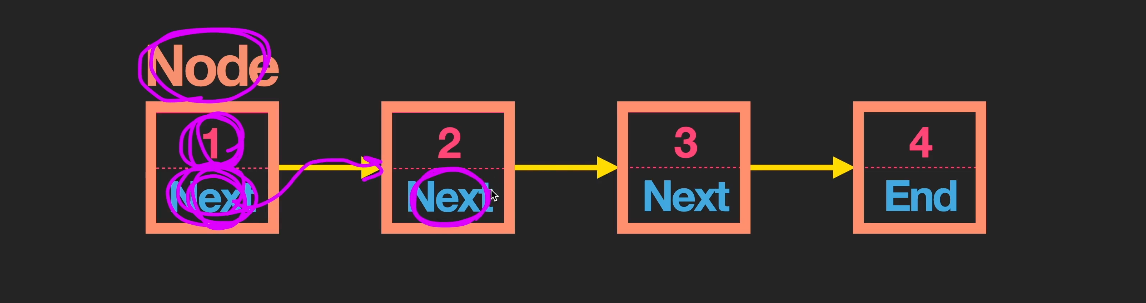
연결 리스트는 물리적으로 비연속적, 논리적으로는 연속적이다.
각 노드들은 데이터를 저장할 뿐만 아니라, 다음 노드의 주소 정보도 가지고 있기 때문에 논리적으로 연속성을 유지하면서 연결될 수 있습니다. 배열의 경우 연속성을 유지하기 위해서 메모리 상에서 순차적으로 데이터를 저장하는 방식을 사용하였지만, Linked List에는 메모리상에서 연속성을 유지하지 않아도 되기 때문에 메모리 사용이 좀 더 자유롭다. 다만 다음 노드의 주소도 추가적으로 저장해야 하기 때문에 데이터 하나당 차지해야 되는 메모리도 커진다.
그렇다면 연결리스트의 노드를 구현해보자
class Node :
  def __init__(self,value=0,next=None):
    self.value = value
    self.next = next

first = Node(1)
second = Node(2)
third = Node(3)

first.next = second
second.next= third
first.value = 6
그렇다면 구현한 노드들로 Linked List를 만들어보자
- 실제 연결리스트는 헤드값을 가지고 헤드는 첫번째 노드의 주소를 가리켜야 한다.
- 완벽하지는 않지만 우선 작동원리만 보자.
class Node :
  def __init__(self,value=0,next=None):
    self.value = value
    self.next = next

class LinkedList(object):
  def __init__(self):
    self.head = None
  def append(self,value):
    new_node = Node(value)
    if self.head is None:
      self.head = new_node
    # 맨 뒤의 노드가 새로운 노드를 가리켜야 한다.
    else:
      current = self.head
      while(current.next):
        current = current.next
      current.next= new_node
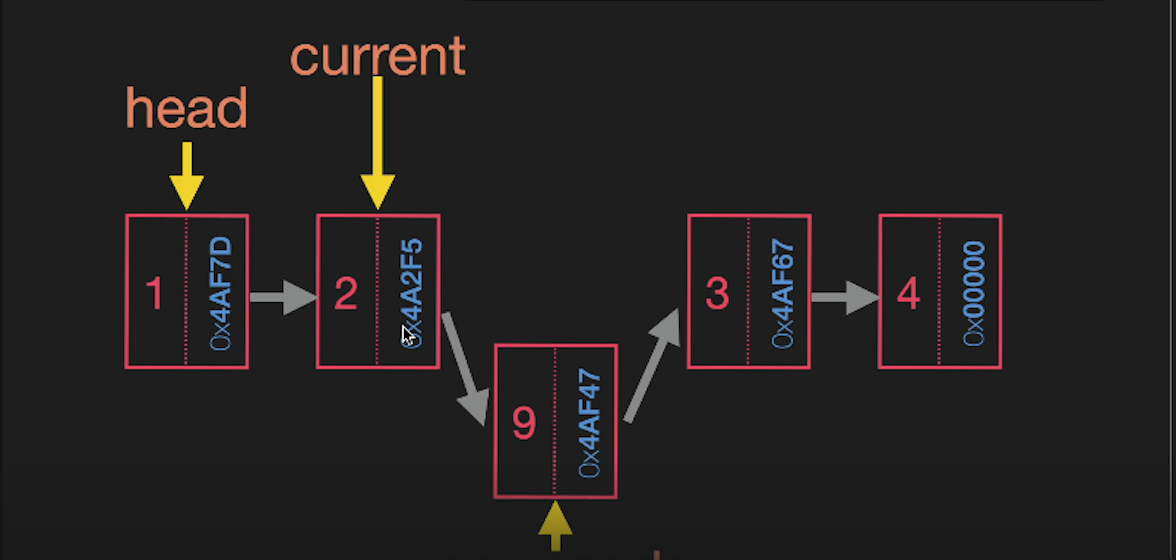
get method 설계하기
연결 리스트에서 get은 단순 배열과는 다르게 랜덤 액세스가 불가능하다. 그래서 첫번째 인덱스부터 해당 타겟 밸류까지 하나하나 순차적으로 접근해야 한다.
- head에 접근
- 원하는 인덱스로 이동
- value반환
- Big O (n)
  def get(self,idx):
    current = self.head
    for _ in range(idx):
      current = current.next
    return current.value
insert_at구현하기 (원하는 인덱스에 밸류 삽입하기.)
- 특정 인덱스에 밸류를 넣으려면 넥스트 밸류의 주소를 연결해준다.
- 그리고 이전 값의 넥스트 밸류 주소를 삽입하는 밸류의 주소로 연결해준다.
remove_at(idx)
- insert_at과 비슷하다.
삭제하려고 하는 특정 인덱스의 이전 값까지 가고 주소를 그 다음 인덱스의 주소로 바꿔준다. 이렇게 하면 가비지 컬렉터에 의해서 알아서 자동으로 삭제될 것임.
insert_back (tail 버전)
- 이전의 append와 다른 좀 다르게 구현
- tail이 있다면 Big O(1)으로 구현 가능
  def append_tail(self,value):
    new_node = Node(value)
    if self.head is None:
      self.head = new_node
    else:
      self.tail.next = new_node
      self.tail = self.tail.next
연결 리스트는 다양한 구현 방법이 있다.
- 다음 주소값 사용
- 이전 주소값 사용
- 헤드와 테일 사용
- 헤드만 사용
리액트에서 연결리스트 자료구조를 사용하는 방법
- 현재 노드는 상태에 저장되고 , UI는 이전 노드나 다음 노드가 있는지 여부에 따라 업데이트
- 버튼을 사용하면 목록을 앞뒤로 탐색하고, 더 이상 이동할 노드가 없으면 비활성화
class Node {
  constructor(value) {
    this.value = value;
    this.next = null;
    this.prev = null;
  }
}

class DoublyLinkedList {
  constructor() {
    this.head = null;
    this.tail = null;
  }

  add(value) {
    const newNode = new Node(value);
    if (!this.head) {
      this.head = newNode;
      this.tail = newNode;
    } else {
      this.tail.next = newNode;
      newNode.prev = this.tail;
      this.tail = newNode;
    }
  }
}

const imageList = new DoublyLinkedList();
imageList.add({ id: 1, src: "image1.jpg", alt: "First Image" });
imageList.add({ id: 2, src: "image2.jpg", alt: "Second Image" });
imageList.add({ id: 3, src: "image3.jpg", alt: "Third Image" });

function Gallery() {
  const [currentNode, setCurrentNode] = useState(imageList.head);

  return (
    <div>
      {currentNode.prev && (
        <img
          src={currentNode.prev.value.src}
          alt={currentNode.prev.value.alt}
          className="prev-image"
        />
      )}
      <img
        src={currentNode.value.src}
        alt={currentNode.value.alt}
        className="main-image"
      />
      {currentNode.next && (
        <img
          src={currentNode.next.value.src}
          alt={currentNode.next.value.alt}
          className="next-image"
        />
      )}
      <div>
        <button
          onClick={() => setCurrentNode(currentNode.prev)}
          disabled={!currentNode.prev}
        >
          Previous
        </button>
        <button
          onClick={() => setCurrentNode(currentNode.next)}
          disabled={!currentNode.next}
        >
          Next
        </button>
      </div>
    </div>
  );
}